![]()
The EUDAT Generic Execution Framework

The GEF software was developed in the frame of EUDAT 2020 as part of the Horizon 2020 programme of the European Union. It enables execution of containerized software tools on data stored in the EUDAT Collaborative Data Infrastructure (CDI). The GEF employs the Docker software containerization technology and uses specifically annotated Docker container images called GEF services for scientific data processing. By deploying these GEF services to Dockerized computational resources as close to the data as possible, data transfers can be minimized. GEF services can also be reused to reproduce results or toolchains. Data inputs to GEF services can be specified via PID or URL before they are automatically transferred to the processing location. Configuration of the GEF allows it to interface with Docker Server and Docker Swarm installations on various platforms. Users can interact with the GEF via a graphical interface (GUI) or an HTTP application programming interface (API). The GEF is using an SQLite database for internal data storage.
The software has grown to a beta release version that is capable of processing data stored in B2SHARE and B2DROP. The GEF is still in development and the second beta release constitutes the end of development in the scope of the EUDAT 2020 project.
Please be aware that while this repository is licensed under the GNU General Public License v2.0, usage of operational EUDAT services like the ones mentioned above (B2SHARE, B2SAFE, ...) is bound to the EUDAT Services Terms of Use.
This documentation includes:
- The Core Idea: GEF Services
- The GEF Testing Instance
- GEF Architecture
- Installing the GEF
- Configuring the GEF
- GEF User Roles
- GEF User Interfaces
- GEF User Workflows
- Release Notes
GEF services are at the core of any scientific workflow supported by the GEF as they encapsulate the tools that are required to perform the data processing. GEF services are based on Docker images (see next paragraph for a brief explanation) that provide a Linux-based transient workspace which can be perceived by users as an encapsulated lightweight Linux operating system running on a temporary file system that only exists while the GEF service is being executed. Scientific user communities are asked to familiarize themselves with the Docker technology in so far as to be able to build their own Docker images as Dockerfiles. Dockerfiles consist of the instruction set necessary for Docker image building (see Dockerfile reference page). Scientific users who wish to employ the GEF are required to upload their Dockerfile to the GEF where the service will be built. The containerization of software tools makes them reusable and mobile since the same Docker image can be instantiated by the GEF at every computation location. Only community administrators are allowed to build new GEF services while community users are restricted to employing them. GEF services can be generated by community administrators by uploading their Dockerfiles through the web user-interface and triggering service building. The GEF then makes these services available at their deployment location. This will be augmented in the future by a controlled GEF service repository based on DockerHub technology that will function as an exclusive storage for GEF services. Such a repository will increase security by creating a closed system that makes all service images that can be enacted by the GEF completely transparent and open to scrutiny. The repository will be populated with service images by trusted Community Adiministrators only.
The idea of the GEF is built around software containerization. This is a lightweight virtualization method which avoids launching a full virtual machine in order to deploy software applications. The currently most popular open-source solution for software containerization is called Docker. A Docker image is a stand-alone and executable package that holds a virtual lightweight Linux environment along with all the necessary software components to run the desired software. Docker containers are the runtime instances of Docker images. They can be spun up on any computer with a Docker installation and a running Docker daemon. The self-contained Docker images are therefore completely reusable on any machine that satisfies these conditions. Extensive information on containerization with Docker and documentation of the Docker software can be found on the official Docker site. Instructions on how to build Docker images and an explanation of Dockerfiles can also be found there.
In the root of the repository there is a folder called GEF/services which contains several GEF demo services. They are not essential for the system and therefore are not available by default (after the installation process). However, they can help to better understand how to build your own GEF services and how they work. If you want to use those services, you can build them through the web interface (by uploading the corresponding Dockerfiles and image-related files found in the dedicated subdirectories). The GEF/services directory also contains a folder _internal which holds several Docker images for internal use by the GEF system. When the GEF connects to a Docker server it builds several custom images that are necessary for the system to function properly. Do not remove them. The GEF will not function properly without them.
Every Docker image needs to be labeled in a specific way to function as a GEF service. Labelling images fills certain metadata fields attached to a Docker image and is currently done by the GEF development team as the number of GEF services is still manageable, but will also become a responsibility of our scientific user communities and the Community Administrators in the future as the number of GEF services grows. The metadata set consists of a collection of labels that we will illustrate with the Stanford Parser example service found on the testing instance. These are the label instructions that annotate the Stanford Parser GEF service taken from the corresponding Dockerfile in GEF/services/stanford-parser:
LABEL "eudat.gef.service.name"="Stanford Parser for English"
LABEL "eudat.gef.service.description"="Parses a given text and produces constituency and dependency trees for each sentence"
LABEL "eudat.gef.service.version"="1.0"
LABEL "eudat.gef.service.input.1.name"="Input Directory"
LABEL "eudat.gef.service.input.1.path"="/root/input"
LABEL "eudat.gef.service.output.1.name"="Output Directory"
LABEL "eudat.gef.service.output.1.path"="/root/output"
Apart from the code made available here on Github, we have set up a GEF testing instance on the VMWare cluster of Gesellschaft für wissenschaftliche Datenverarbeitung in Göttingen (GWDG) to showcase the GEF's functionality. You can visit it at https://eudat-gef.mpimet.mpg.de where you will find a preinstalled GEF server. Use your browser to test a few example services that we have provided for this purpose. More example services will be added as they become available. You will not be able to build new services on the testing instance, but you can try out the existing ones. Please also note that the GEF testing instance requires B2ACCESS user authentication if you wish to run a GEF service. It currently relies on the B2ACCESS development instance instead of the official B2ACCESS instance which requires users to create separate accounts on the development instance.
This section includes a description of the main GEF components and how they interact with each other, and a brief overview of the most important technologies involved. The basic architecture of the GEF is comprised of a frontend and a backend. The GEF frontend consists of a web user interface written in JavaScript conforming to the ECMAScript 6 specification and uses the React library for building the user interface in combination with Redux for state management and Bootstrap user interface design templates. The GEF backend is written in Go and functions as page server to the web user interface and as client to a Docker Swarm represented by a manager node, interfacing with it through the Docker HTTP/HTTPS Remote API. Thus, the backend relies on the Docker application containerization technology for data processing. Within the swarm, one or more manager nodes are responsible for distributing tasks to the worker nodes. A swarm may consist of a single manager node that functions as a worker node and can be scaled up, but no upper limit to the swarm size is documented. The GEF was designed in a modular way allowing the GEF backend to be exchanged if different (containerization) technologies are to be employed. The prerequisite for any processing of data is a GEF service provided by the respective scientific user community. This service needs to contain the installed software tools required for the desired computation. The GEF can enact such services close to the data storage location if the GEF deployment node where computation takes place is Docker-enabled. The following diagram illustrates the different GEF components and how they interact with each other:
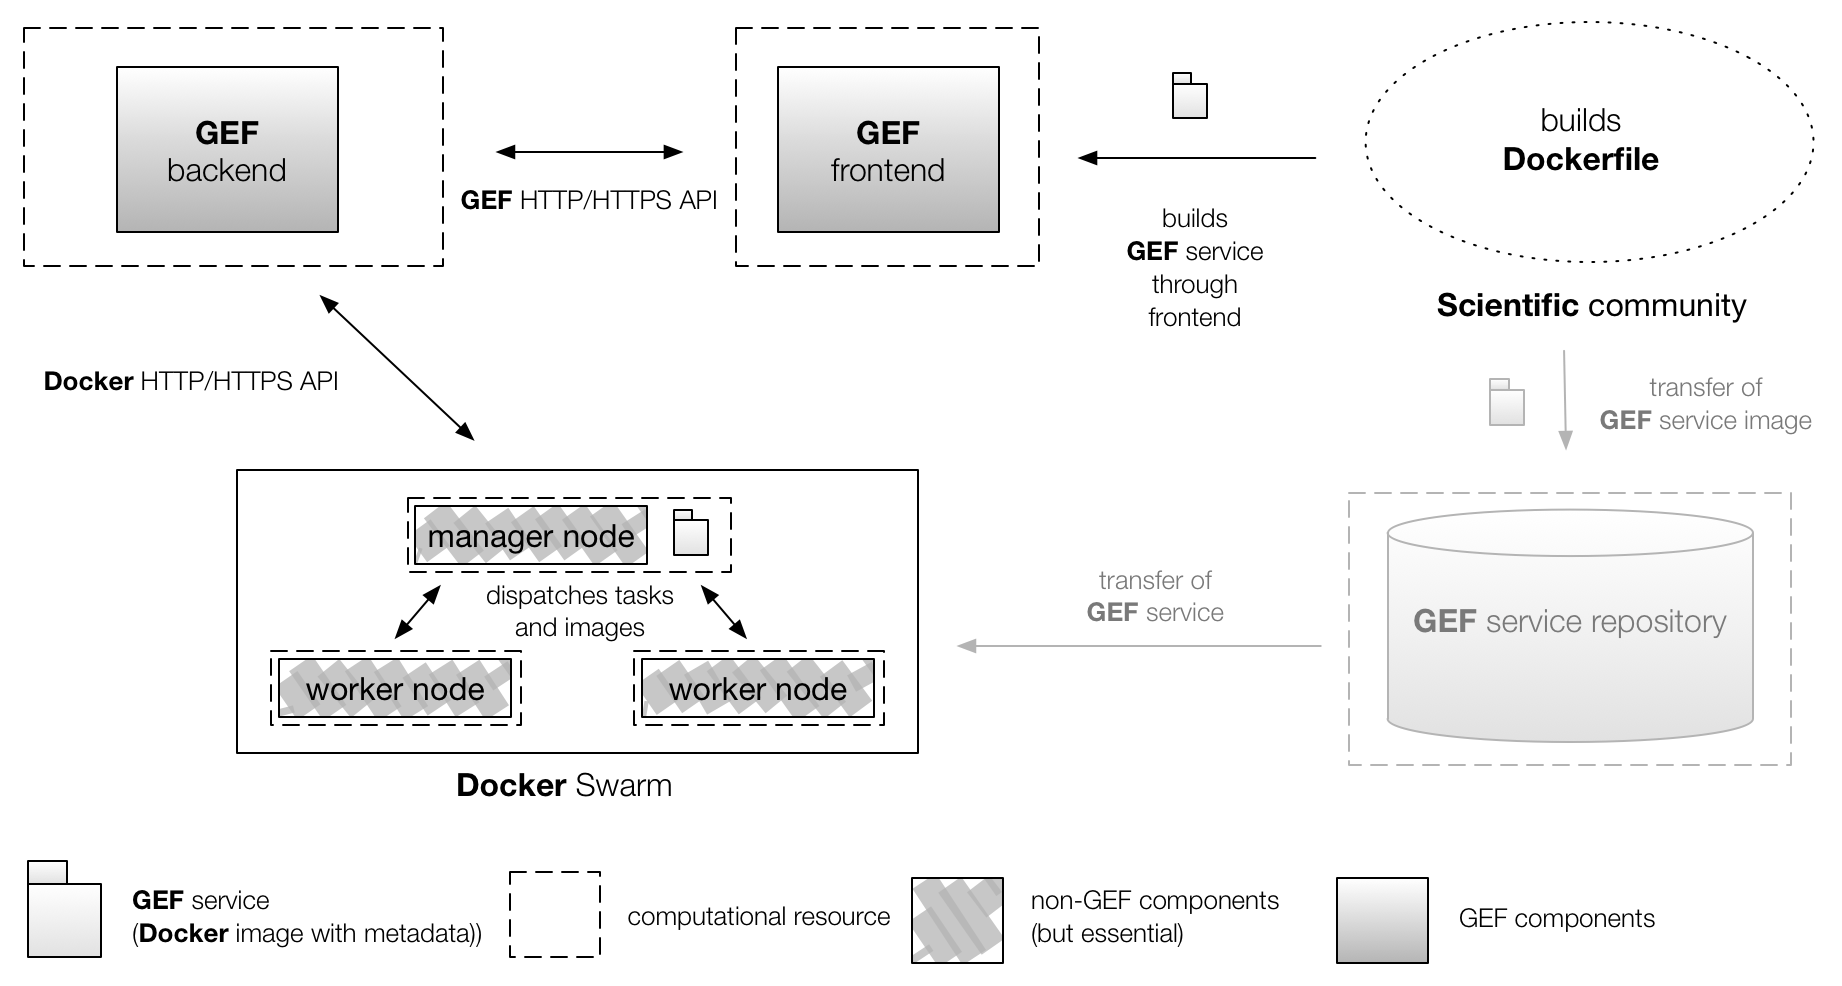
Please note that the GEF frontend, GEF backend, and the Docker Swarm manager node to which the GEF backend is a client interact via HTTP/HTTPS. This allows colocation of all components as well as the distributed deployment depicted here. Also note that although Docker Swarm was chosen in this diagram, the GEF backend can still operate with a single Docker Server without having to rely on the swarm mode. The GEF service repository shown in a subdued tone and already mentioned above is a future component that is still being conceptualized.
It is up to the scientific user communities to choose a machine with a Docker installation or a Docker Swarm to connect the GEF backend to and to configure the GEF accordingly. The actual proximity of this chosen location and the storage location of the input data are the main factors in determining the data transfer distance and cost. This distance can be across the entire globe or within a local network. Ideally for leveraging the architecture of the GEF to minimize data transfers, the Docker installation where GEF services are invoked is located on the same machine as the input data, but we expect that in most cases it will only be in the vicinity of it. With the current internal configuration of the GEF even in this ideal case, input data still need to be transferred into the container where data-processing takes place. This means there is always a data transfer that currently cannot be avoided. In the future, site administrators will be able to configure their GEF backend to access folders on the installation machine directly. This feature was omitted in the current development for security reasons.
Since the GEF is still in development, it is expected that it will still undergo changes. You can follow the known issues that we are working on via Github. And to start with, please be aware of the following:
- we have tested the GEF GUI with several internet browsers and we recommend using the latest versions of 'Google Chrome' or 'Mozilla Firefox'. Older versions of these browsers and 'Apple Safari' have exhibited unexpected behaviour when viewing the GEF pages.
If you want to install the GEF yourself and build your own GEF services, either use the 64-bit Linux binary you can build (see Packaging GEF Source Code for Deployment section) or follow the installation instructions below. This will allow you to build your own GEF service with a Dockerfile and execute it. Please refer to the original Docker documentation for more information on Dockerfiles. Also be aware of the best practices published here. Building GEF services from Dockerfiles is explained below.
Follow these instructions to set up your own GEF server instance with a GEF 64-bit Linux binary:
- Download the latest GEF 64-bit Linux binary archive file from here
- Unpack the tarball to a dedicated folder and set it as the current directory
- Inspect and change the default server configuration in the
./config.json(see section onconfig.json) - Create a new self-signed certificate for the GEF server (with
make certificate) or editconfig.jsonto use your own (see section onconfig.json) - Define the
GEF_SECRET_KEYenvironment variable (a random string is preferred, remember it and keep it in a safe location), e.g. withexport GEF_SECRET_KEY="E60su8IL6VY6Ca2" - Define the
GEF_B2ACCESS_CONSUMER_KEYandGEF_B2ACCESS_SECRET_KEYenvironment variables for connection to the B2ACCESS service. Please check this link for details on registering a B2ACESS OAuth client, then export the newly registered username and password asGEF_B2ACCESS_CONSUMER_KEYandGEF_B2ACCESS_SECRET_KEYenvironment variables. - Run
./gef_linuxto start the GEF. - The GEF Server is now running and the user interface can be reached on default port 8443. Go to
https://localhost:8443to see whether the GEF user interface is online. - Adjust your webserver configuration to map this port to the HTTPS port 443 to make the GEF visible from the outside.
Follow these instructions to build the GEF from sources and deploy a GEF server:
-
Make sure you have the following tools installed on your machine:
-
Set a GOPATH, e.g. with
export GOPATH=/Users/myself/Projects/Go. -
Use
go getto clone the GEF repository withgo get -u github.com/EUDAT-GEF/GEF. -
Go to the downloaded repository location with
cd $GOPATH/src/github.com/EUDAT-GEF/GEF. -
Create a new self-signed certificate for the GEF server (with
make certificate) or editconfig.jsonto use your own (see section onconfig.json) -
Define the
GEF_SECRET_KEYenvironment variable (a random string is preferred, remember it and keep it in a safe location), e.g. withexport GEF_SECRET_KEY="E60su8IL6VY6Ca2" -
Define the
GEF_B2ACCESS_CONSUMER_KEYandGEF_B2ACCESS_SECRET_KEYenvironment variables for connection to the B2ACCESS service. Since the development instance of B2ACCESS is used, random keys can be used here. -
Build the project with
make build. -
Start the GEF with
make run_gef. -
The GEF Server is now running and the user interface can be reached on default port 8443. Go to
https://localhost:8443to see whether the GEF user interface is online. -
Adjust your webserver configuration to map this port to the HTTPS port 443 to make the GEF visible from the outside.
For packaging the GEF source code into a binary you will only need to have the GEF source code and docker installed on your machine. After the GEF source code is modified you can build a 64-bit Linux binary
by running the make pack command. The command will create an archive which you can unpack and run it on a server as described in the installation instructions above. After that do cd build/bin and run ./gef_linux. The GEF server should be running now.
We give an example configuration of an Apache webserver used in development. If you are using Apache, you may want to use a configuration similar to the one below. Note that the webserver is used as a proxy for mapping the default GEF port 8443 to the HTTPS port 443.
Listen 443
NameVirtualHost *:443
<VirtualHost *:443>
    SSLEngine on
    SSLProxyEngine on
    SSLProxyVerify none
    SSLProxyCheckPeerCN off
    SSLProxyCheckPeerName off
    SSLProxyCheckPeerExpire off
    ProxyRequests off
    SSLCertificateFile /etc/apache2/ssl/ssl.crt
    SSLCertificateKeyFile /etc/apache2/ssl/ssl.key
    ProxyPreserveHost On
    ProxyPass / https://127.0.0.1:8443/
    ProxyPassReverse / https://127.0.0.1:8443/
</VirtualHost>
The GEF can be configured by editing the config.json file found in the GEF/gefserver directory of your installation. In the file six thematic sections of key/value pairs can be found. They are Docker, Pier, Server, EventSystem, Limits and Timeouts. The Server section has three more subsection named B2DROP, B2ACCESSand Administration. The file offers the following settings:
| Key name | Default value | Description |
|---|---|---|
| Endpoint | unix:///var/run/docker.sock | Defines the Docker daemon location. The default sock indicates that the local machine is used. |
| TLSVerify (optional) | no default bool | Sets whether the Docker client checks TLS certiifcates. |
| CertPath (optional) | no default string | Path to client certificate. |
| KeyPath (optional) | no default string | Path to client key. |
| CAPath (optional) | no default string | Path to Certificate Authority (CA) root certificate. |
See here to familiarise yourself with the way Docker employs client certificates.
| Key name | Default value | Description |
|---|---|---|
| InternalServicesFolder | ../services/_internal | Directory containing the GEF internal services’ content (Dockerfiles and corresponding files). The GEF has several internal services that are built while the system starts, if the images do not already exist (e.g. data staging, volume inspection, data download from a volume) |
| Key name | Default value | Description |
|---|---|---|
| Address | :8443 | Port address the GEF is using. |
| ReadTimeoutsSecs | 10 | Read timeout for the server (in seconds). |
| WriteTimeoutsSec | 10 | Write timeout for the server (in seconds). |
| TLSCertificateFilePath | ../ssl/server.crt | Path to a TLS certificate. |
| TLSKeyFilePath | ../ssl/server.key | Path to a TLS key. |
| Key name | Default value | Description |
|---|---|---|
| BaseURL | https://unity.eudat-aai.fz-juelich.de | URL to B2Access instance used for authentication. By default for the GEF beta version, this is the B2ACCESS development instance, not the official one. |
| RedirectURL | https://localhost:8443/wui/b2access/ | GEF URL from which the user will be redirected to the B2Access authentication form. |
| Key name | Default value | Description |
|---|---|---|
| BaseURL | https://b2drop.eudat.eu/ | URL to B2DROP instance to be used. |
| Key name | Default value | Description |
|---|---|---|
| SuperAdminEmail | email@example.com | Email address of the super administrator for the GEF (put here the email you used during the registration at the B2Access development instance to become a super administrator). |
| ContactLink | https://www.eudat.eu/support-request?service=Other | URL of the contact link at the bottom of the page. Points to the official EUDAT contact request form. |
| Key name | Default value | Description |
|---|---|---|
| Address | no default value | Address of the event system (rule engine system). By default the event system is off and the attribute is empty. The event system is still experimental. |
| Key name | Default value | Description |
|---|---|---|
| CpuShares | 1024 | CPU shares (relative weight vs. other containers). |
| CpuPeriod | 100000 | The CPU period to be used for hardcapping (in microseconds). Set to 0 (zero) to use system default, which is 100 milliseconds. |
| CpuQuota | 50000 | The CPU hardcap limit (in microseconds). Allowed CPU time in a given period (e.g. set this value to 50000 to limit the container to 50% of a CPU resource). |
| Memory | 400024000 | Memory (in bytes) available for a container. |
| MemorySwap | 450024000 | Memory swap (in bytes) available for a container. |
| Key name | Default value | Description |
|---|---|---|
| DataStaging | 1000 | Timeout for the data staging container (in seconds). |
| VolumeInspection | 1000 | Timeout for the volume inspection container (in seconds). |
| FileDownload | 1000 | Timeout for the file download container (in seconds). |
| Preparation | 100 | Container creation timeout (in seconds). |
| JobExecution | 7200 | Job execution timeout (in seconds). |
| CheckInterval | 10 | Timeouts are checked on a timer, here you can set its interval (in seconds). |
Four user groups exist that represent different levels of trust granted to users. The most trusted users are GEF Superadministrators, followed by Community Administrators and Community Users. All of these require a B2ACCESS user account to log in and access the GEF. The remaining group is the general user who was not authenticated through B2ACCESS and therefore also cannot log in as the user's trustworthiness cannot be ascertained.
GEF Superadministrators are designated by setting the B2ACCESS email address in the Administration section of the config.json file. They have the right to assign user roles to all other logged in users through a designated page on the GUI or via web API. The dropdown menu of your user icon on the top right reveals the 'Manage Roles' page which allows the Superadmins to assign users identified by their B2ACCESS email addresses to user groups. Superadmins can also create GEF services, run jobs and view the job history.
GEF Community Administrators are meant to be designated by a scientific community to be the owners of its GEF services. Community Admins therefore can create new GEF services, run jobs and view the job history. Users who are to become Community Admins need to be assigned this role by a GEF Superadmin and require a B2ACCESS account.
GEF Community Members are all members of a scientific community who want to employ GEF services. They can run jobs from existing services and view the job history. They cannot create new GEF services. Users who wish to become Community Members need a B2ACCESS account.
General Users have not been authenticated with B2ACCESS and are therefore unable to log in. They can only view the job history, but neither run jobs nor create new GEF services.
The GEF provides a browser-based GUI that individual researchers can use to execute computation jobs with GEF services or that administrators may employ to assemble GEF services. The browser interface and the HTTP API were designed to be functionally similar, but both interfaces may still change as GEF development continues. The browser interface allows navigation to pages for building a GEF service, browsing and inspecting all locally stored GEF services and their metadata, and browsing and inspecting all finished and running computation jobs, as well as viewing their input and output volumes. The HTTP API is designed to expose GEF functionality as a web service. The accessible functionality includes requests for creating GEF services, for running computation jobs, and for querying information about volumes and downloading computation results from specific data volumes. Several more API functions exist for user management.
| URL | Method | Requested | Output | Description |
|---|---|---|---|---|
| /api/info | GET | API version information in JSON | Information about API (welcome page), can be used to check if backend is running | |
| /api/builds | POST | JSON object with information about the location and build ID | Creates a temporary folder when an image has to be created. It returns a buildID identifier and a folder location. This folder is used to store a Dockerfile and files needed for the image. BuildID is a string like a UID in Java (which is generated when required and it is unique) | |
| /api/builds/{buildID} | POST | {buildID} build identifier and a multipart request body containing files (Dockerfile, files that have to be in the image) | JSON object with information about the image and the corresponding service | Builds an image provided a buildID (which points to the folder with the Dockerfile), returns JSON with the information about the image and the new service (partly taken from the metadata) |
| /api/services | GET | JSON with the list of all services | Lists all available services | |
| /api/services/{serviceID} | GET | {serviceID} an id of a service | JSON with information about a specific service | Returns information about a specific service |
| /api/services/{serviceID} | PUT | {serviceID} an id of a service, form data with new service metadata | JSON with information about a specific service | Modifies metadata of a specific service |
| /api/services/{serviceID} | DELETE | {serviceID} an id of a service | JSON with service information | Deletes a specific job |
| /api/jobs | POST | serviceID and pid | JSON object with information about the location and jobID | Executes a job. We submit a form to this URL when we want to run a job. PID is resolved, files are downloaded and saved to an input volume |
| /api/jobs | GET | JSON with the list of jobs | Lists available jobs | |
| /api/jobs/{jobID} | GET | {jobID} id of a job | JSON with job information | Information about a specific job |
| /api/jobs/{jobID} | DELETE | {jobID} id of a job | JSON with job information | Deletes a specific job |
| /api/volumes/{volumeID}/{path:.*} | GET | {volumeID} is an id of a volume, {path} is a path inside this volume (root folder by default) | JSON object (nested) with the list of the files and folders in a given volume | Lists all files and folders (recursively) in a given volume |
NOTE: curl command should be used with --insecure option, since the current version of the system has only self-signed certificates
examples folder contains a Python script that demonstrates how to start a job and download its output by means of the GEF API
- HTTP method: GET
- URL path: /api/info
- Requested parameters: none
- Returns: API version information in JSON
Example: curl https://$HOSTNAME/api/info --insecure
Returns
{ "ContactLink":"https://www.eudat.eu/support-request?service=Other","ServiceName":"GEF","Version":"0.3.0" }
- HTTP method: POST
- URL path: /api/builds
- Requested parameters: none
- Returns: JSON object with information about the location and build ID
Example: curl -X POST https://$HOSTNAME/api/builds?access_token=$ACCESS_TOKEN --insecure
Returns
{"Location":"/api/builds/936cbabd-e6d1-435d-af1c-ac0bcc10eb1a","buildID":"936cbabd-e6d1-435d-af1c-ac0bcc10eb1a"}
- HTTP method: POST
- URL path: /api/builds/$BUILD_ID
- Requested input data: files that should be inside the docker image
- Returns: JSON object with information about the image and the corresponding service
Example: curl -X POST -F 'filename=@$FILE_PATH' https://$HOSTNAME/api/builds/$BUILD_ID?access_token=$ACCESS_TOKEN --insecure
Returns
{"Service":{"ID":"98f473a8-3177-47fc-9e47-5357fc46f88f","ConnectionID":1,"ImageID":"ac6301f4e618504f5ce2fe05e3b3dc8dfdc96049ba7abfe27bbe4ab016d5521c","Name":"Stanford Parser for English","RepoTag":"service_ac6301f4e618504f5ce2fe05e3b3dc8dfdc96049ba7abfe27bbe4ab016d5521c:gef","Description":"Parses a given text and produces constituency and dependency trees for each sentence","Version":"1.0","Cmd":["/root/stanford-parser-full-2016-10-31/lexparser.sh","/root/input/*.txt"],"Created":"2017-11-08T13:52:19.783627116Z","Deleted":false,"Size":1276590082,"Input":[{"ID":"input0","Name":"Input Directory","Path":"/root/input","Type":"url","FileName":""}],"Output":[{"ID":"output0","Name":"Output Directory","Path":"/root/output","Type":"","FileName":""}]}}
- HTTP method: GET
- URL path: /api/services
- Requested parameters: none
- Returns: JSON with the list of all services
Example: curl https://$HOSTNAME/api/services --insecure
Returns
{"Services":[{"ID":"81b133c0-679c-4bb3-89fe-ab6630e7b78b","ConnectionID":1,"ImageID":"dc34bc1796e3ddb359223f80bb19a5b71f191f095b8b3aaf94c9fbc250b556bc","Name":"NLTK POS-tagging","RepoTag":"service_dc34bc1796e3ddb359223f80bb19a5b71f191f095b8b3aaf94c9fbc250b556bc:gef","Description":"Performs text segmentation (splits into sentences) and POS-tagging","Version":"1.0","Cmd":["python","/root/posTagger.py"],"Created":"2017-11-10T10:26:29.110312556Z","Deleted":false,"Size":591312160,"Input":[{"ID":"input0","Name":"First Input Directory","Path":"/root/input1","Type":"url","FileName":""},{"ID":"input1","Name":"Second Input Directory","Path":"/root/input2","Type":"string","FileName":"input2.txt"}],"Output":[{"ID":"output0","Name":"Output Directory","Path":"/root/output","Type":"","FileName":""}]},{"ID":"98f473a8-3177-47fc-9e47-5357fc46f88f","ConnectionID":1,"ImageID":"ac6301f4e618504f5ce2fe05e3b3dc8dfdc96049ba7abfe27bbe4ab016d5521c","Name":"Stanford Parser for English","RepoTag":"service_ac6301f4e618504f5ce2fe05e3b3dc8dfdc96049ba7abfe27bbe4ab016d5521c:gef","Description":"Parses a given text and produces constituency and dependency trees for each sentence","Version":"1.0","Cmd":["/root/stanford-parser-full-2016-10-31/lexparser.sh","/root/input/*.txt"],"Created":"2017-11-08T13:52:19.783627116Z","Deleted":false,"Size":1276590082,"Input":[{"ID":"input0","Name":"Input Directory","Path":"/root/input","Type":"url","FileName":""}],"Output":[{"ID":"output0","Name":"Output Directory","Path":"/root/output","Type":"","FileName":""}]}]}
- HTTP method: GET
- URL path: /api/services/$SERVICE_ID
- Requested parameters: none
- Returns: JSON with information about a service
Example: curl https://$HOSTNAME/api/services/$SERVICE_ID --insecure
Returns
{"Service":{"ID":"81b133c0-679c-4bb3-89fe-ab6630e7b78b","ConnectionID":1,"ImageID":"dc34bc1796e3ddb359223f80bb19a5b71f191f095b8b3aaf94c9fbc250b556bc","Name":"NLTK POS-tagging","RepoTag":"service_dc34bc1796e3ddb359223f80bb19a5b71f191f095b8b3aaf94c9fbc250b556bc:gef","Description":"Performs text segmentation (splits into sentences) and POS-tagging","Version":"1.0","Cmd":["python","/root/posTagger.py"],"Created":"2017-11-10T10:26:29.110312556Z","Deleted":false,"Size":591312160,"Input":[{"ID":"input0","Name":"First Input Directory","Path":"/root/input1","Type":"url","FileName":""},{"ID":"input1","Name":"Second Input Directory","Path":"/root/input2","Type":"string","FileName":"input2.txt"}],"Output":[{"ID":"output0","Name":"Output Directory","Path":"/root/output","Type":"","FileName":""}]}}
- HTTP method: PUT
- URL path: /api/services/$SERVICE_ID
- Requested parameters: none
- Returns: JSON with information about a service (updated)
Example: curl -X PUT -d '{"Created":"2017-11-10T10:26:29.110312556Z","Description":"Performs text segmentation (splits into sentences) and POS-tagging","ID":"81b133c0-679c-4bb3-89fe-ab6630e7b78b","ImageID":"dc34bc1796e3ddb359223f80bb19a5b71f191f095b8b3aaf94c9fbc250b556bc","Input":[{"ID":"input0","Name":"First Input Directory","Path":"/root/input1","Type":"url","FileName":""},{"ID":"input1","Name":"Second Input Directory","Path":"/root/input2","Type":"string","FileName":"input2.txt"}],"Name":"NLTK POS-tagging updated","Output":[{"ID":"output0","Name":"Output Directory","Path":"/root/output","Type":"","FileName":""}],"RepoTag":"service_dc34bc1796e3ddb359223f80bb19a5b71f191f095b8b3aaf94c9fbc250b556bc:gef","Size":591312160,"Version":"1.0"}' 'https://$HOSTNAME/api/services/81b133c0-679c-4bb3-89fe-ab6630e7b78b?access_token=$ACCESS_TOKEN' --insecure
Returns
{"Service":{"ID":"81b133c0-679c-4bb3-89fe-ab6630e7b78b","ConnectionID":1,"ImageID":"dc34bc1796e3ddb359223f80bb19a5b71f191f095b8b3aaf94c9fbc250b556bc","Name":"NLTK POS-tagging updated","RepoTag":"service_dc34bc1796e3ddb359223f80bb19a5b71f191f095b8b3aaf94c9fbc250b556bc:gef","Description":"Performs text segmentation (splits into sentences) and POS-tagging","Version":"1.0","Cmd":["python","/root/posTagger.py"],"Created":"2017-11-10T10:26:29.110312556Z","Deleted":false,"Size":591312160,"Input":[{"ID":"input0","Name":"First Input Directory","Path":"/root/input1","Type":"url","FileName":""},{"ID":"input1","Name":"Second Input Directory","Path":"/root/input2","Type":"string","FileName":"input2.txt"}],"Output":[{"ID":"output0","Name":"Output Directory","Path":"/root/output","Type":"","FileName":""}]}}
- HTTP method: DELETE
- URL path: /api/services/$SERVICE_ID
- Requested parameters: none
- Returns: JSON with information about a service (removed)
Example: curl -X DELETE 'https://$HOSTNAME/api/services/$SERVICE_ID?access_token=$ACCESS_TOKEN' --insecure
Returns
{"Service":{"ID":"81b133c0-679c-4bb3-89fe-ab6630e7b78b","ConnectionID":1,"ImageID":"dc34bc1796e3ddb359223f80bb19a5b71f191f095b8b3aaf94c9fbc250b556bc","Name":"NLTK POS-tagging updated","RepoTag":"service_dc34bc1796e3ddb359223f80bb19a5b71f191f095b8b3aaf94c9fbc250b556bc:gef","Description":"Performs text segmentation (splits into sentences) and POS-tagging","Version":"1.0","Cmd":["python","/root/posTagger.py"],"Created":"2017-11-10T10:26:29.110312556Z","Deleted":false,"Size":591312160,"Input":[{"ID":"input0","Name":"First Input Directory","Path":"/root/input1","Type":"url","FileName":""},{"ID":"input1","Name":"Second Input Directory","Path":"/root/input2","Type":"string","FileName":"input2.txt"}],"Output":[{"ID":"output0","Name":"Output Directory","Path":"/root/output","Type":"","FileName":""}]}}
- HTTP method: POST
- URL path: /api/jobs
- Requested form data: serviceID and pid
- Returns: JSON object with information about job ID
Example: curl -X POST -F 'serviceID=$SERVICE_ID' -F 'pid=$PID' 'https://localhost:8443/api/jobs?access_token=$ACCESS_TOKEN' --insecure
Returns
{"Location":"/api/jobs/7f600e7f-8dc6-4c8f-8c70-7206e9f207b6","jobID":"7f600e7f-8dc6-4c8f-8c70-7206e9f207b6"}
- HTTP method: GET
- URL path: /api/jobs/$JOB_ID
- Requested parameters: none
- Returns: JSON with information about a job
Example: curl https://$HOSTNAME/api/jobs/$JOB_ID --insecure
Returns
{"Job":{"ID":"d1fb3522-97a5-4c95-9352-b27e0e74a90f","ConnectionID":1,"ServiceID":"11edd34a-1096-4759-a08a-f76a3d3ab751","Created":"2017-11-20T16:10:08.911285+01:00","Duration":9,"State":{"Status":"Ended successfully","Error":"","Code":0},"InputVolume":[{"VolumeID":"436def021fd6ec34f5357438a5ce6d0f9db241b7c75aa7fe231651a12bf36c3a","Name":"First Input Directory"},{"VolumeID":"76799b335378d9499ea19972b81ef568913665234d5d23bdd8fcefe85166e25a","Name":"Second Input Directory"}],"OutputVolume":[{"VolumeID":"939d6d35b59fafaaa01c01345244b65b7650013261335b20afd856e9353a0a72","Name":"Output Directory"}],"Tasks":[{"ID":"de540120-62b0-4dfe-b13a-f8c5bc2b32d6","Name":"Data staging #\u0001","ContainerID":"3e9c266b9cc3333a81c0b15a55ed094c56b9064c03bc4013bbd5a7e2f76e7ce7","SwarmServiceID":"","Error":"","ExitCode":0,"ConsoleOutput":"downloading text.txt\n"},{"ID":"dcd1a97d-13b6-4a82-b89c-32eeac012a8b","Name":"Service execution","ContainerID":"afbffd7ea5a7998f669ab2d4d0610a614351eb2c401ceec65963a81405038fd8","SwarmServiceID":"","Error":"","ExitCode":0,"ConsoleOutput":"Starting to read files\n/root/input2/input2.txt\nSentence #0: text\n/root/input1/text.txt\nSentence #0: What has happened in recent years has brought to our attention the tremendous problems facing not only to the producers of food but also the consumers.\nSentence #1: We must strike a balance between them.\nSentence #2: We must resolve this issue, because it is important that consumers should regain confidence in the food they eat.\nSentence #3: One way to achieve this is to have total transparency as far as food labelling is concerned.\nSentence #4: GMOs are the new challenge facing us.\nSentence #5: This is something that people are very worried about and quite rightly so: I myself share these concerns.\nSentence #6: But I think we should not allow our concerns about GMOs to overshadow our concerns about growth promoters used in animal feed or antibiotics used in compound feed.\nSentence #7: Indeed, we should not allow GMOs to obscure the fact that meat and bonemeal are still included in animal feeds in many countries in Europe.\nSentence #8: One factor behind these developments that has been referred to in this debate is competition - competition between Member States on the cost of the production of food.\nSentence #9: These are all areas in which we have to ensure a level playing field: food must be of the same standard in all Member States.\nSentence #10: We have had the dioxin scare, BSE and many other problems.\nSentence #11: The main problem is a financial one, namely who bears the cost?\nSentence #12: The problem is that the cost is not shared equally between the consumer and the producer: the producer has been forced to bear all the cost.\nSentence #13: We need an equitable distribution of the extra cost that has been incurred.\nSentence #14: We must also ensure that the food that is imported into the European Union meets the standards within the European Union.\nSentence #15: If we do not maintain those standards for imported food then we are going to encounter greater difficulties in the future.\nWriting parsing results into a file\nDone\n"}]}}
- HTTP method: DELETE
- URL path: /api/jobs/$JOB_ID
- Requested parameters: none
- Returns: JSON with information about a job (removed)
Example: curl -X DELETE 'https://$HOSTNAME/api/jobs/$JOB_ID?access_token=$ACCESS_TOKEN' --insecure
Returns
"Job":{"ID":"d1fb3522-97a5-4c95-9352-b27e0e74a90f","ConnectionID":1,"ServiceID":"11edd34a-1096-4759-a08a-f76a3d3ab751","Created":"2017-11-20T16:10:08.911285+01:00","Duration":9,"State":{"Status":"Ended successfully","Error":"","Code":0},"InputVolume":[{"VolumeID":"436def021fd6ec34f5357438a5ce6d0f9db241b7c75aa7fe231651a12bf36c3a","Name":"First Input Directory"},{"VolumeID":"76799b335378d9499ea19972b81ef568913665234d5d23bdd8fcefe85166e25a","Name":"Second Input Directory"}],"OutputVolume":[{"VolumeID":"939d6d35b59fafaaa01c01345244b65b7650013261335b20afd856e9353a0a72","Name":"Output Directory"}],"Tasks":[{"ID":"de540120-62b0-4dfe-b13a-f8c5bc2b32d6","Name":"Data staging #\u0001","ContainerID":"3e9c266b9cc3333a81c0b15a55ed094c56b9064c03bc4013bbd5a7e2f76e7ce7","SwarmServiceID":"","Error":"","ExitCode":0,"ConsoleOutput":"downloading text.txt\n"},{"ID":"dcd1a97d-13b6-4a82-b89c-32eeac012a8b","Name":"Service execution","ContainerID":"afbffd7ea5a7998f669ab2d4d0610a614351eb2c401ceec65963a81405038fd8","SwarmServiceID":"","Error":"","ExitCode":0,"ConsoleOutput":"Starting to read files\n/root/input2/input2.txt\nSentence #0: text\n/root/input1/text.txt\nSentence #0: What has happened in recent years has brought to our attention the tremendous problems facing not only to the producers of food but also the consumers.\nSentence #1: We must strike a balance between them.\nSentence #2: We must resolve this issue, because it is important that consumers should regain confidence in the food they eat.\nSentence #3: One way to achieve this is to have total transparency as far as food labelling is concerned.\nSentence #4: GMOs are the new challenge facing us.\nSentence #5: This is something that people are very worried about and quite rightly so: I myself share these concerns.\nSentence #6: But I think we should not allow our concerns about GMOs to overshadow our concerns about growth promoters used in animal feed or antibiotics used in compound feed.\nSentence #7: Indeed, we should not allow GMOs to obscure the fact that meat and bonemeal are still included in animal feeds in many countries in Europe.\nSentence #8: One factor behind these developments that has been referred to in this debate is competition - competition between Member States on the cost of the production of food.\nSentence #9: These are all areas in which we have to ensure a level playing field: food must be of the same standard in all Member States.\nSentence #10: We have had the dioxin scare, BSE and many other problems.\nSentence #11: The main problem is a financial one, namely who bears the cost?\nSentence #12: The problem is that the cost is not shared equally between the consumer and the producer: the producer has been forced to bear all the cost.\nSentence #13: We need an equitable distribution of the extra cost that has been incurred.\nSentence #14: We must also ensure that the food that is imported into the European Union meets the standards within the European Union.\nSentence #15: If we do not maintain those standards for imported food then we are going to encounter greater difficulties in the future.\nWriting parsing results into a file\nDone\n"}]}}
- HTTP method: GET
- URL path: /api/volumes/$VOLUME_ID/$PATH
- Requested parameters: none
- Returns: list of files and folders in JSON
Example: curl 'https://$HOSTNAME/api/volumes/$VOLUME_ID/$PATH?access_token=$ACCESS_TOKEN' --insecure
Returns
{"volumeContent":[{"name":"results.csv","size":5424,"modified":"2017-11-10T10:28:18.37186562Z","isFolder":false,"path":"","folderTree":[]}],"volumeID":"09c31ae40ba0bb04e4d7786311b7373775a9b565e8e416cc5d38b267e49ef3c0"}
| URL | Method | Input | Output | Description |
|---|---|---|---|---|
| /api/user | GET | JSON with the information about the current user | Returns information about the current user | |
| /api/user/tokens | POST | Form data with the name of a token {tokenName} | JSON with the new token | Adds a new token for the current user |
| /api/user/tokens | GET | JSON with the list of all user tokens | List all tokens for the current user | |
| /api//user/tokens/{tokenID} | DELETE | {tokenID} an id of a token | Server response code | Removes a specific token from the current user |
| /api/roles | GET | JSON with the list of all roles | Lists all available roles | |
| /api/roles/{roleID} | GET | {roleID} an id of a role | JSON with the list of users | Returns a list of users to which a certain role was assigned |
| /api/roles/{roleID} | POST | {roleID} an id of a role | Server response code | Assigns a specific role to the current user |
| /api/roles/{roleID}/{userID} | DELETE | {roleID} an id of a role assigned to the user with the user id {userID} | Server response code | Removes a role from a user |
The GEF and its Docker backend are currently designed to serve two basic user workflows. Together these workflows are sufficient for initiating data processing with the GEF on a given data set and retrieving the results. The first user workflow is meant to be the prerogative of community administrators and results in a new GEF service from the respective community. It is called the Service Building Workflow. The second workflow uses a given GEF service to perform a computation on input data specified by a community user. This one is called Service Enactment Workflow. Although service building is a precondition for service enactment, these two workflows do not need to be implemented in conjunction if the GEF service to be enacted already exists. Users can choose to interface with the GEF via the browser user interface or via the HTTP API to implement these workflows. Please note that user groups are not implemented yet and the GEF makes no distinction between users. The following describes these user workflows step by step.
The GEF employs a description of the file, the environment, and the commands a Docker image is composed of to build GEF services. This description is called a Dockerfile. To build a GEF service from a given Dockerfile, a Community Administrator or Superadministrator needs to perform the following workflow steps:
-
Create a Dockerfile from which Docker can build an image that serves as a GEF service. This requires familiarity with Dockerfiles and their function within the Docker system. It also requires knowledge of the scientific tools employed within the community and how to install them. Metadata labels for the image that qualify it as GEF service have to be specified in this Dockerfile as well.
-
Upload the Dockerfile and other necessary files to the GEF.
-
Trigger building the new GEF service.
After the GEF service has been built successfully, it is available as a service to be enacted.
In order to enact a GEF service on a given data set, a Community Administrator or a Community User needs to perform the following workflow steps:
- Select the GEF service to be enacted.
- Submit the PID/URL of the input data set, automatically triggering the computation in the form of a job.
- Inspect the console or the output volume and download the results if the job completed the computation successfully.
The GEF does not yet allow chaining of individual jobs. Later GEF versions aim to support mounting an output volume of one job to be the input volume of another to orchestrate a sequence of computation jobs.
- Multiple inputs and outputs for the GEF jobs (service metadata format has been changed, now inputs have types: string or URL)
- ReadMe was extended: API calls examples with curl command. Descriptions for the new endpoints were added
- The second directive engine support
- Async service building. Now the system does not time out if the image building process takes too much time
- UI improvements: jobs table sorting bug fix, fewer warnings in the debugging console, minor bug fixes